On this episode, we are joined by Melody Payne, a.k.a. “The Plucky Pianista”. Melody has been writing online since 2012, sharing innovative and forward-thinking ideas for teaching music more effectively.
In this conversation, we talk a lot about getting “off book” – meaning being able to play even without the note-by-note sheet music in front of you.
Melody shares an impactful early experience with a performance that went wrong and how she eventually learned to handle musical mistakes with grace.
She found a great way to get started playing by ear and improvising with a friend, and that led on to wanting to equip her students with the tools needed to feel that freedom.
Melody teaches two particular skills and uses a special app to help her young students quickly start playing the songs they love in their own way without needing to learn them note-by-note.
One thing a lot of musicians struggle with is how to make their performances actually sound good – not just hitting the right notes at the right time, but actually moving the listener. Melody shares insights on her “Three Rules for a Magical, Musical, Moving, Performance”.
If you’ve ever felt limited to playing just the notes that are put in front of you, you’re going to love this episode. Melody shares so openly and has real insights on getting “off book”.
Listen to the episode:
Links and Resources
Enjoying The Musicality Podcast? Please support the show by rating and reviewing it!
Rate and Review!
Transcript
Melody Payne: Okay. Alright. Hi, this is Melody Payne of MelodyPayne.com and you are listening to the Musicality podcast.
Christopher: Welcome to the show Melody, thank you for joining us today.
Melody Payne: Thank you so much, it’s great to be here. Thanks for having me.
Christopher: So let’s start at the beginning, I’d love to hear how did you first get started making music? Were you someone who took to it really easily or did it take a bit more work when you were early on in your music education?
Melody Payne: I grew up in a household with both parents who were hobbyist musicians. So having a piano in our home was something that had been part of our home for my entire life. My mom played the piano, and as a matter of fact she used to play this song when my sister and I were really, really small and we would dance, and dance, and dance, until we got so tired that we fell asleep and took a nap. So having music in our house was just a normal way of life on a day to day basis. My dad sang in the choir at church and my sister and I we both sang in the children’s choir at church so we had a lot of musical opportunities from day one.
Christopher: Great and how did you feel about music? Was it just kind of a natural and normal part of your life then?
Melody Payne: It really was and at some point when I was around six years old I believe, I started going over to the piano and asking my mom to teach me things. That lasted for a little while but I know a lot of parents would agree that the parent-child, teacher-student relationship doesn’t always work out, and that’s how it went with my mom and I. So they found a local teacher for me. My first teacher was 17 years old and I was seven. And I-
Christopher: Wow and how did that go for you?
Melody Payne: It actually, it went really, really well. I was just such a little sponge I wanted to learn everything I could and soak it all in just any kind of music, any kind of … Well not any kind of performance opportunity. I was a very timid performer but any kind of music that I could practice at home by myself made me very happy.
Christopher: And what do you think made you a timid performer?
Melody Payne: My personality probably. I have a huge tendency towards perfectionism and I have a Type A personality and I’m also a very tender, sensitive, person. So when you combine all those things together, it makes performing in public pretty terrifying at times because I don’t like to make mistakes in front of other people. To me it’s still a very scary thing. Although at this point in my life as an adult I have learned how to gracefully get past it, and not make a big deal about it, like I did when I was a child, but making a mistake in a recital just felt like the end of the world at that point.
Christopher: Are there any experiences that particularly stand out?
Melody Payne: One time when I was, I think about eight or nine years old. I don’t remember exactly how old I was. My piano teacher had been helping me learn lots of different types of music. I was assigned a very special book that was not just a method book, it was actually a hymn arrangement book. She chose one of the songs in it for me to play in church for the first time. Of course, I was scared to death. My hands were shaking. I was just terrified, even though the church was really, really small. I think we probably had about maybe between 60 and 80 members. Most of whom I was related to on top of that, but I was still scared to death.
So I go up to the piano bench, in the middle of the service when it was my turn to play and I had practiced, and practiced, and practiced. I had pretty much memorized the entire song and about a minute into the performance I made some really little, tiny little, error. I don’t even remember what happened specifically but I froze. I absolutely froze and I couldn’t figure out how to get past that moment of just being terrified.
I looked over at my parents. I remember clearly sitting there on the piano bench, looking over at my parents like, “Please help me, I don’t know what to do.” So they kind of motioned for me, “Okay, come sit down, you can come sit down, it’s okay.” And after that experience I was just so traumatized, I didn’t wanna play in public ever again. You know quite honestly, that was a pivotal moment for me and I highly doubt anyone else who was there that day has any recollection of it whatsoever. But for me it was a very, very, pivotal moment in my musical life.
Christopher: I feel your pain. You know I could look back on not that quite dramatic but similar experience of just suddenly realizing I didn’t have the control I thought I did over the music I was playing and I guess I was raised in the very kind of note by note system where you memorize your repertoire and then you stand up on stage and you perform it.
Melody Payne: Yes.
Christopher: And it sounds like you were in a similar situation where you hadn’t necessarily been prepared either for how to gracefully handle a mistake or how to have the inner instinct for music that lets you actually make up a solution even if it’s not the exact right notes.
Melody Payne: Right, I hadn’t been trained in either one of those areas and I was trained on the page. I didn’t have any experience doing anything off of the page, at all, whatsoever. I didn’t even have the faintest idea how to begin improvising or making up a solution on the spot as you mentioned or just getting out of the mistake or getting out of the moment of being frozen solid. That is something that I try my best to help my own students to be able to do because for me it was such an experience that I remember so clearly even 30 plus years later.
Christopher: It can leave scars. You know when we work with adults, musicians at Musical U, we have a whole module dedicated to getting musical confidence and a lot of it is about, kind of visualizing and remembering, and thinking through what happens if you do make a mistake and how can you be prepared and how can you be okay with the fact that you’ve made mistakes in the past and so it’s great to hear that’s a part of what you work on with your students.
Melody Payne: Absolutely, and to hear that you’re actually working and teaching people that it’s okay that you made a mistake; that is okay. That’s part of the learning process. That’s … I do try to help my students understand that it is okay. A lot of people especially, like myself who have the perfectionistic tendencies, have a very difficult time admitting that we made a mistake. That is a very, very, difficult thing to do. So actually being able to help these kids to work through that sometimes, it’s so rewarding to me because I can see myself in them so much from when I was that age. To help them to be able to work through some of these things just feels like, it feels like an honor.
Christopher: Fantastic. So tell us how did your musical life develop from there? You had this pivotal moment and realized maybe that you weren’t equipped in the way you could be or should be to handle that performance situation. How did things go over the next few years?
Melody Payne: I would not play in front of anyone. I was-
Christopher: Oh, gosh.
Melody Payne: …I just did not want to play in front of anyone because I was just so scared, that I would find myself in that situation again and again I wouldn’t know how to get out of it, or how to recover. I didn’t even know there was such a thing as recovering from mistakes. In my mind, you practiced it until it was perfect and then when you played it in front of people, it should still be perfect, but obviously that is not how music works.
So it took me a little while to be encouraged by my parents enough to be willing to play in front of people again. It wasn’t because I wasn’t encouraged by my parents. They were constantly saying, “Hey, play this for uncle so-and-so” or “Play this for cousin so-and-so” and we would be at family reunions and things like that but I didn’t want any part of that whatsoever. I was still too scared.
As I got into high school, I had a really good friend, well we’re still really good friends to this day. His name is Brad and he only played by ear. He didn’t know how to read music or if he did it was very minimally. I played only on the page. I didn’t know how to play by ear or improvise. So in high school, the two of us would get together, wherever we came across a piano. It didn’t matter where it was. We would get together and we would sit down at this piano and we would just jam duets. So he was teaching me how to play by ear and how to understand that you know what, it’s okay if you didn’t play the correct harmony there. That is no big deal. The big thing that’s important is that we’re having fun. We’re learning how to express ourselves as musicians. We are stepping outside the box so to speak of only reading music and to me that began a time in my life of being okay with who I was as a musician and not feeling like I had to be so scared anymore of making a mistake. So for me, it was very freeing at that time.
Christopher: That’s wonderful and before we go on and talk about how your music life was different after that, I’d love to just pause for a minute and dive in because I think the idea of sitting down with a friend who can play by ear and just having a jam session. I know to a lot of our audience that sounds amazing and incredibly hard to do. So would you mind, can you take us back to one of those jam sessions and what it was like, like when you sat down with Brad and you were at the keyboard, what did that look like? What were you talking about and how did he help you to break free of those notes on the page?
Melody Payne: One of the main things, well there are really two main things I remember happening. One of the main things was that he would sit down on the bass end of the piano and he would start to play … I guess sometimes it was maybe a pop song or hymn or something like that that just centered around just a few chords. It wasn’t classical music or anything like that. It was something more, chord progression, very simple chord progression that repeated itself quite frequently throughout the music. He would sit down and play the piece and then he would have me sit down at the treble end and just start trying to match what he was doing.
Of course the first time he asked me to do that, it completely blew my mind. I had no idea where to start. It was a monumental moment, the first time that I just started paying attention to what chords he was playing, okay, he’s playing a C chord and an F and a G, and maybe an A minor. I did know enough about chords at that point that I could at least recognize what he was playing and then using my ear, I started picking up on what the progression was. Then I just started mimicking what he was doing. Then a little while after I got used to doing that, he said, “Okay, now start playing the melody.” And I went, “Uh-oh.” Mind blown again. But after, he kept encouraging me and we kept trying and trying and rehearsing it over and over again.
After quite a few attempts, it started to feel a little bit easier and I started to feel like, “Oh, this is what improvising is. This is what playing by ear is.” Because up until that point, I really didn’t understand what those two things meant. It was a really big moment right there when he would just sit down at the bass end, and then we would switch places and then he would say, “Okay, now you play the chord progression and octaves and chords or whatever, and I’m going to improvise the treble notes.” So we would switch back and forth, back and forth and then eventually, things just started falling into place and it started to become a really fun activity.
Christopher: Fantastic. So it sounds like you really learned in a practical way. You were training your ears, you were doing it, you were learning by doing, really.
Melody Payne: Yes, absolutely. I had not had any type of ear training at that point in my life specifically. So this was all brand new to me but yes, the hands on experience for me I don’t think could have come at a better time and I don’t think it could’ve been any better of an experience. It was really that important for me.
Christopher: Great and how did your musical journey continue? Was that an area that you really focused on in the years to come or were you more taking that confidence back to the sheet music and the more traditional repertoire based approach?
Melody Payne: I didn’t specifically focus on playing by ear or improvising so much because to me that was just the fun thing that we did when we hung out together. So I wasn’t quite making that connection yet, but I went on to major in music and then I went on to get my masters in music. Here’s where the next part of the puzzle fits in.
In my master’s degree I was a graduate assistant or a teaching assistant or a lot of different universities call them different things but one part of my job was to teach beginning piano class. A couple of the aspects of that class, a couple of the items that the students had to prepare for their piano proficiency were playing by ear and different styles, harmonizing melodies, and reading lead sheets. So at that point I actually learned the musicals, well not musical but I guess the technical side, here’s what a lead sheet looks like. Here’s what a chord chart looks like. Here are come actual steps to playing by ear so the fact that I had to actually teach those things to these young music majors. When I myself still wasn’t very comfortable with them; made me study them a tremendous amount before I would go in the class room and attempt to say, “Okay, here’s what we do, step one, step two, step three.” So that was sort of the next part of the puzzle and then since that point, was when I started working with my students on the lead sheets and the chord charts and I just really believe that that is as fundamental of a pert of music study as anything else.
Christopher: That sounds like such a wonderful beginner’s piano curriculum. It sounds like it was fortunate as a part of your own musical journey because so many beginner piano courses would be just notes on a page and they wouldn’t even think of introducing the student to a lead sheet early on.
Melody Payne: Right and this was the Alfred group piano for adults piano course for undergraduate music majors who were not piano majors and I just thought it was fabulous. It had so many things. I was actually a little bit jealous that they were getting to learn all these things and I had not learned them earlier in my life. So it was really great.
Christopher: Wonderful, and so you went on to teach piano yourself.
Melody Payne: Yes.
Christopher: And it sounds like you really incorporated this into your own methodology.
Melody Payne: Yes especially right now. I live in the Blue Ridge Mountains of southwest Virginia and in this region we have a lot of blue grass music and a lot of Appalachian folk music and jam sessions are huge. Knowing how to read a chart or play a lead sheet or play by ear, those things are incredibly important skills to have in this area especially for young musicians. Especially in the last seven years since I’ve lived here has become a huge part of what I teach in my piano lessons for my students.
As a matter of fact, I have one little girl, she’s 12 years old and a couple of years into her piano lessons, she’s been taking lessons for four years. This will be year number five. A couple of years into her piano lessons, as soon as she got comfortable and coordinated enough to play chords, I started introducing her to chord charts. She immediately became successful at playing chord charts because to her, in her mind, her brain understood reading a letter on a page and being able to do something on a piano with that much better than reading the notes on the page and being able to do something with that.
So we’ve taken it and run with it. She actually plays keyboard and sings lead in church every Sunday now and she’s 12 years old. I mean her-
Christopher: Wow.
Melody Payne: …It’s just wonderful. It’s fabulous. That’s sort of what I want all my students to be able to do is take whatever these tools are that we do in their piano lessons and just go out into the world and have fun.
Christopher: That’s such a great attitude and it’s funny I think that piano is maybe the one of if not the most extreme instrument for showing that different perspective. Because I think people imagine classical piano and very complex pieces, a lot of notes on the page and the constant pianist is juggling so much mentally. at the same time it’s also a beautiful instrument for thinking in terms of chords and the groups of notes are played together based on just a lead sheet or just a chord chart. It’s wonderful that you’re equipping your students to understand both perspectives.
Melody Payne: Thank you I really feel that it’s so important and as a matter of fact I have two new students. They’ve had lessons just during the summer and their ages 10 and 12, they’re sisters. I started with time in their separate method books so we’ve been going through the information and they’ve been practicing and we’ve been doing all this. I also started them playing five note scales or pentascales depending on how you phrase it. I showed them, I sat down and played a song by Adele just using chords, something that I’ve memorized, the chord progression and I started playing a little bit of it and I said, learning those five note scales is step one to being able to do what I just did, and their eyes got so big. They were so excited about being able to play all their favorite pop songs really, really soon.
So I sort of use it as little bit of a teaser to say, “Okay, if you learn all your scales and chords, then we can start learning all these fun songs, and it will be amazing.” So they love it.
Christopher: That’s great. I mean you are officially in fact Dr. Melody Payne. You have a doctorate in music education and I think to some people it would be shocking to hear a doctor of music education talk in such glowing and passionate and creative terms about the process of learning piano and but I suppose in your doctorate studies you just went so deep you understood what really mattered. Would that be the right way to put it?
Melody Payne: I think that’s a great way to put it. For me going all the way through school for 10 years to get my doctorate was what I knew I needed to do because I wanted a college teaching position and I did that for several years. I was in music faculty for several years. Then when I met my husband and we got married and he got relocated to southwest Virginia where we are now, there wasn’t a place for me to be a music faculty member anymore.
So I had to sort of carve out my own business, I guess. Become an independent piano teacher once again which I had not been in quite a while. I think it was actually such a huge gift to be able to do that here because I learned all the technical aspects of things and all the book knowledge and all of that all the way through school. But even though I’m not currently teaching at a university, I feel like right now being able to put into practice all of those things that I’ve learned and being able to get to know each student as an individual and figure out exactly where they are on any given day and go from there and teach them the musical tools that will give each student the best success possible, which yes, I learned how to do that during my years of graduate school but I’ve really learned how to do that since I’ve been an independent piano teacher again. That’s actually put a lot of the glow back into my voice because I get to spend my afternoons with these wonderful children. There’s nothing like it. There is nothing like it.
Christopher: Fantastic. So you mentioned that lead sheets and chord charts and I think for a lot of people in our audience, that would be quite unfamiliar to them they may be used to more notes on a page and I’d love for you to share a little bit about how you help your students kind of familiarize themself with what it means to play from a lead sheet or a chord chart.
Melody Payne: The first thing I do, like I mentioned a few minutes ago is help them to become familiar with their five note scales, and then broken and block chords, and as soon as they are comfortable with a few of those, then we start moving into chord charts and I like the app iReal Pro. That is a fantastic app because it contains a huge library of chord charts and of course it has the backing tracks so that you can play along.
Usually what I try to do is find one that’s very, very simple, that only has four or five different chords in it, so that they can be successful from the start and maybe has one unfamiliar chord in it so that I can start to teach them things like what a slash chord is or a seventh chord or suspended chord; different things like that.
So I actually use the chord charts as teaching tools as well but I have the students first of all just play basic chords with their right hand or their left hand. To me it doesn’t matter what hand they use as long as they’re now starting to get the picture that their hand is going to have to move around on the piano. Because for a lot of them, this is the first experience they’ve had with that skill so it might be a little timid, “Oh, I have to move my hand? What are you talking about?” So yes you have to move your hand and it’s going to be okay. No worries. Just look at the letter and then play the chord that you see. Then I start to explain that each letter gets a certain number of beats and we just kind of go from there and start layering. Maybe they play a single note with their left hand and the chord with their right hand to create an accompaniment and that way I teach them that they can sing along, which most of them are like I was when I was a child and they don’t want to sing out loud in front of me, which is okay. So I sing out loud in front of them, help them feel a little better. We all have to be vulnerable sometimes right?
So I just use those chord charts as teaching tools and then eventually when their reading skills have caught up with their chord skills, then I start to introduce lead sheets. Then I tell them they can just go on different sheet music websites and they can Google the name of the song lead sheet, or just find a pop song that they like, that has the chords above the staff and we go from there.
Christopher: Wonderful, and that must give them so much of a sense of confidence and freedom compared with just saying here is the two staff sheet music for a classical piece, let us learn it note by note.
Melody Payne: It does and it’s really amazing. Some of the parents come to the lessons in my studio. Not all of them do. The kids make them stay outside but some of the little ones still are okay if their parents come in and take pictures and listen and enjoy.
I have a particular piano mom, her name is Laura, and she is one of the most supportive and kind piano moms. Her little girl, Hope, just turned eight years old this summer and we have started doing chord charts and lead sheets together and I have looked over on the couch in my studio where the parents sit and have seen the mom wiping a tear or looking like she’s about to burst with joy and seeing these little children playing chords and doing things with both hands when they have not done that yet, is a huge boost for the parents. At that moment I think the parents kind of think, “Oh my goodness, my kid can really do this.” It’s a huge, huge self-esteem boost for the kids too.
Christopher: That’s such a great insight and it reminds me back when I learned piano I started out with a jazz piano curriculum and I learned a few instruments so I was kind of familiar with sheet music and music theory but it was still fairly note by note and then a few years later, I discovered this thing called chord piano which was kind of let’s learn the triad chords and use those as our building blocks. Like you say it just, it’s not a shortcut but it does allow you to leap forwards in what you can create musically. The sound of the music you’re creating is suddenly so much more fuller, and richer, and more flexible, compared with going through the more and more complex note reading.
Melody Payne: Yes, absolutely. It is, definitely.
Christopher: So you’ve integrated this into your own teaching but it would be a huge understatement to say you are just running a very successful piano studio now. In fact, you’re known worldwide as one of the most prominent music teacher bloggers online and I hesitate to use the word blogger because it doesn’t seem like it does it justice. I’d love to give just a couple of examples of what you publish at MelodyPayne.com.
Melody Payne: Certainly.
Christopher: Because you’re sharing such valuable insights there both for music teachers and individual music learners.
Melody Payne: Alright.
Christopher: Would that be okay?
Melody Payne: Absolutely.
Christopher: So one post that really stood out to me was one called, “Three Rules for a Magical, Musical, Moving, Performance” and just from the title, I was excited because we often focus so much on the instrument technique we forget about making it sound musical and moving and even creating a bit of magic with it. So could you share a little bit about that post and what you were communicating there?
Melody Payne: Absolutely. That post, a little bit of that post stemmed back from when I was younger. Like I said I was very Type A. I was very perfectionist so I wanted to do exactly what my teachers asked me to do. But when they said things like, “play musically”, or “play from your heart”, or “play with feeling” I didn’t know what that meant. I had too concrete of a personality. I needed black and white instructions. How do you play musically? But I didn’t quite understand that it was okay if I asked that question, I just thought I wasn’t getting it. But like I said, I went through grad school, went through college, kept playing piano as a high school student and eventually I understood what it meant when the teacher was saying play with feeling or play from your heart. I started putting it together that, well there is actually a step by step process I can use, thank goodness, this is so much easier.
So that’s why I came up with this blog post, is because I break it down to the very simplest form of learning how to play musically and this is how I teach all my little ones. From early on in their piano lessons, how to play musically. From the very first lesson, I teach them, I call them the music rules, and I tell them this is what music wants to do. When you help the music do what it wants to do, it makes your playing sound so amazing and obviously make a big deal about it when you’re telling these little kids. They’ll try anything because they have much less inhibition. They’re less self-conscious so they’ll try it and it’s wonderful. I’ve actually as I’ve said in this particular blog post, I’ve had a mom during the interview be moved to tears because her child played musically in the interview. All because I introduced what I call the very first rule of music, which is usually the last note of a piece of music is the softest. And I say now if the last note is fireworks, we do not play the last note the softest, but if the piece of music is about a kitten or if it’s about, whatever it’s about. If the last, generally speaking, if the last note is the softest, so I teach them a piece of music I wrote, we’d play the duet, and I help them to understand that if you get softer at the end it makes the piece of music you’re playing sound finished.
That’s the first basic concrete step that I use to teach my students to play musically. It works great for older students as well. It doesn’t have to be just for eight year olds. Anyone, doesn’t matter what age, eight years old through 80 years old can use that rule to make their playing sound more musical. And then from there, I begin to move on into a couple of other rules and we build from there and eventually incorporating those concrete rules of musicality, begins to feel natural. It’s a that point that the real music making starts to happen I think.
Christopher: That’s wonderful and I think what I particularly loved about that post was that you weren’t afraid to simplify and generalize. I think a lot of music teachers, they would hesitate to give that kind of advice because they know that there are times where it won’t be the quietest note in the piece that’s at the end. The reality is that a set of rules like that is a huge, a huge headstart in finding your own musicality and understanding how do you make something sound more musical. So I love that you were willing to step out there and say, “Look, these three rules are a really great place to start.”
Melody Payne: Well thank you. They actually helped me as I was going through the process myself of figuring out my own musicality. Because up until that point, well I’m going to use a very strong word here but up until that point, I felt like an imposter. I did not feel like a real musician because I did not understand what it meant to play musically or to play with feeling or to play from the heart. So now I never want any of my own students to feel like an imposter. So giving them these tools that they can use in the lesson or at home or wherever they are, they’re simple enough and they are basic enough but they pack a huge punch.
Christopher: That’s so empowering.
So the other post I wanted to touch on is one of the kind of hot topics for pianists because we’re often called upon to step up and accompany someone or equally we might be a singer as well and we want to be able to just sit down at the keyboard and play as we sing. You wrote a terrific post called, “Accompanying 101: Ten Tips for Beginning Accompanists.” Could you tell us a bit about that one and where it came from and what you share in that post?
Melody Payne: Yes absolutely. I have myself been an accompanist in one fashion or another since high school. A lot of the tips that I present in this post are things that I’ve just learned and figured out on my own along the way. When I was in undergrad, I accompanied for a lot of people’s voice lessons. So I wasn’t only in my own piano lessons learning from my teacher, I was in voice lessons and trumpet lessons and clarinet lessons and anything else and I was paying attention to what all of their professors were saying as well. So when the professor told me, “Okay, we need you to do this here.” I took it to heart and I said okay, well I’m not only going to do that here, I’m going to do it everywhere the music does that. So as I continued though undergrad and continued accompanying, it wasn’t really occurring to me that I was learning things about being an accompanist that I might one day be able to offer to other people. A few years ago one of my high school students was asked to accompany her high school choir’s Christmas concert. She had never done that before but she’s a fantastic pianist. She’s actually starting her junior year majoring in music right now so I’m very proud of her but she brought her music that the choir director at her high school had given to her and she said, “What do I do? I’m practicing it but I’m sure that just practicing these songs will not be enough.” So we focused on accompanying skills for about a month in her piano lessons.
The first five things on the lists were on my original blog and I had originally blogged about that after working with my student Rebecca. Then I recently updated it and moved it to my new blog at MelodyPayne.com and added five more tips. I just feel like if you’re as prepared as you can be as an accompanist and you’ve put a lot of these tips into practice, then you’re going to have the most successful first experience accompanying that you can. So, if you are following these tips then I feel like you won’t go in there not knowing what to expect at all. I feel like it at least can help you prepare a little bit for what’s going on at the first rehearsal.
Christopher: That’s great and I think it is really close to a running theme here which is you specialize in helping people get off the book and going beyond just the notes on the page are telling them to do. I think maybe the trap a lot of people fall into with accompanying is they think, “As long as I play the accompaniment perfectly according to the score, I’ve done my part.” I think in that article you’re showing that actually it’s a skill in itself.
Melody Payne: Yes absolutely it is. For me particularly one thing I’d like to mention is that there was a particular piece of music that I was given to play for our high school choir. I accompany our high school choir here in my town and the accompaniment in the left hand had huge four note chords. Well I have a tendency to get tendonitis in my left thumb and in my left wrist if I’m playing too many big chords and the piece is very fast which this particular one was. So I had to come up with ways to protect the health of my wrist and my thumb so that meant leaving out a few notes. That meant maybe playing the octaves or maybe just playing a three note triad instead of a four note huge chord. Being a good accompanist also encompasses being able to make the changes that you need to make for your own physical health but still be able to provide the music that is necessary to support the singers or other musicians that you’re accompanying.
Christopher: Absolutely and that’s a beautiful example because it shows the importance of the skills we were talking about earlier, understanding piano in terms of chords and understanding to find the right notes and to change the notes. Having practiced that more creative and improvisational and play by ear side of things, I think you’re much more empowered as an accompanist to say, “Okay, I’m not gonna play exactly what’s written because that’s not the best for this situation.”
Melody Payne: Absolutely and another example of that is if there is a very difficult passage. I know a lot of times a lot of the more modern choral arrangements there might be a pause in the singing and then the piano just goes off and does all of this fancy stuff. But it might also occur in the middle of a page turn. Well all of that is not possible unless you memorize everything and you turn your page four measures early or four measures late. So sometimes what I do if I encounter a situation like that is I use chord symbols. If it’s an arpeggio, I don’t worry about memorizing the arpeggio, I just see my different chord symbols as I’m turning the page with the opposite hand and I just play somethings that is in those chords. The harmonies are there and it’s okay if I as an accompanist don’t play every single note that’s written into the piano score.
It took me a while to get to that point because there is a fear of, “Oh my goodness. We can’t leave notes out. Someone composed those notes. We cannot leave them out.” But someone who arranged the music on the page might not have put the page turn in the best spot so we have to do what we have to do in order to still be able to accompany the musicians and not get left behind because we’re fumbling around in our page turn in the middle of the big arpeggio section.
Christopher: For sure. I think if you’re listening to this and you’re feeling inspired, I know a lot of people listening will be in that situation of feeling constrained in playing the notes that to play and craving that ability to go beyond the notes on the page and take ownership of which notes they choose to play and when to perfectly suit the musical situation.
If you’re feeling inspired and interested and all of that resonates with you, I’d highly encourage checking out MelodyPayne.com. Those are just two examples of blog posts she wrote there and there’s a vast treasure trove of information about these kinds of skills and how to learn them. Even how to teach them and of course there’s also a whole store of resources for music teachers in particular if you want to introduce this kind of thing into your own music teaching.
So thank you so much Melody for joining us today and sharing about your own experiences and also these insights on what can transform someone I think from a robotic player who feels terrified in performance situations because they don’t know what to do if they don’t play exactly the right notes into someone who feels relaxed and confident and capable as you explained to even move the audience to tears their own musicality. So I’m so happy to have you with us on the show today. Thank you for sharing so openly. Do you have any final words of advice or maybe you can tell the audience where to head if they want to know more about your approach and dig more into all of these concepts.
Melody Payne: Well my website is MelodyPayne.com and my blog is located there. Actually the MelodyPayne.com website is the hub of everything that I do so if you go there you will be able to see any branch of whatever is going on for me musically or professionally in anyway. I feel that it’s important to meet the students where they are and to be able to take them from that point and any given lesson on any given day, to the next step. Whether that point is learning music rule number one or whether that point is figuring out how to analyze a Beethoven sonata or whether that point is learning how to play a chord chart for the first time, to play a favorite pop song. So being able to break things down into the easiest digestible form is something that I believe that is necessary for not just piano teachers but for music teachers or for any kind of teacher for that matter. I’m just grateful for the opportunity to be able to share that with everyone. So thank you so much for having me here today.
Christopher: Our pleasure, and we’ll have links to Melody’s website and her music resources store and everything we’ve mentioned in this episode in the show notes. Thank you again Melody.
Melody Payne: Thank you. Have a great day.
The post Getting “Off Book”, with Melody Payne appeared first on Musical U.
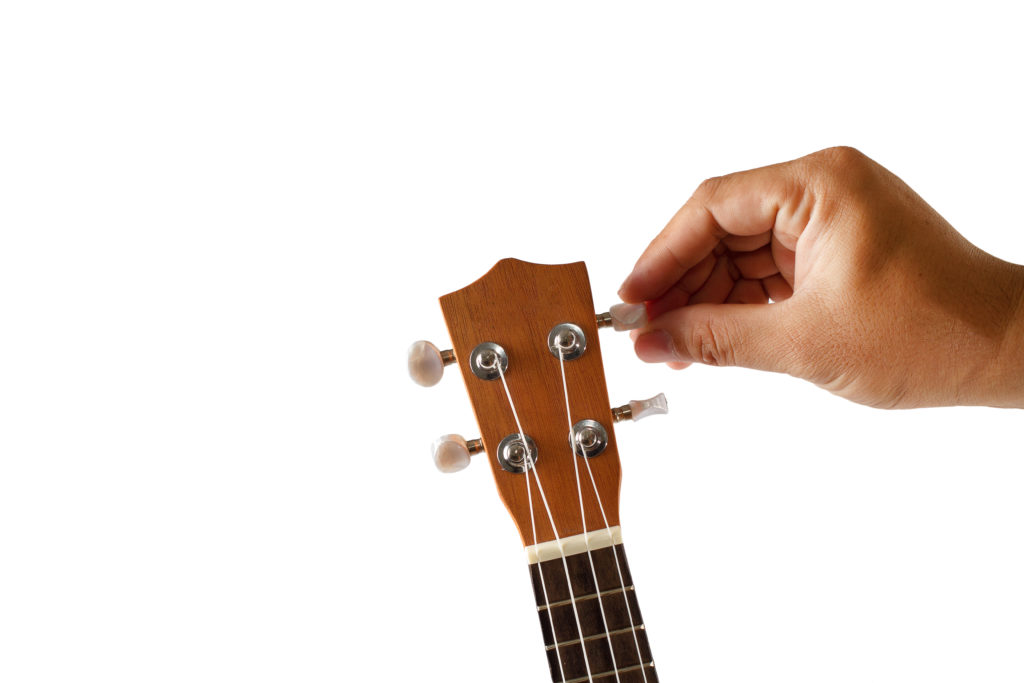 The first thing that I would recommend is to stop using your tuner to get your ukulele in tune. Yes, it’s fast, but it’s a shortcut that robs you of the opportunity to use and develop your ears.
 When it comes to working out songs by ear, I always recommend starting with the same song: Happy Birthday. The reasons for this are pretty obvious – it’s a song that we all know very well, we’ve all heard it many times, and we’ve sung it unaccompanied lots of times too.

 Thanks to a wave of Jamaican immigration to Britain a decade previously, ska experienced a second surge of popularity in the late 1970’s, in the form of “2 Tone”. Rhythms and melodies from first wave Jamaican ska were combined with elements of punk rock to yield music that had a different attitude, and was more uptempo and high-energy than first wave ska.
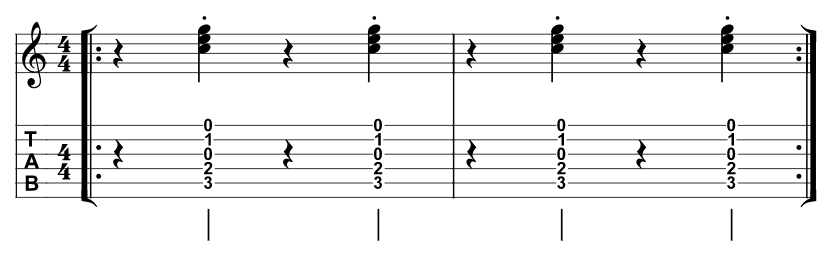
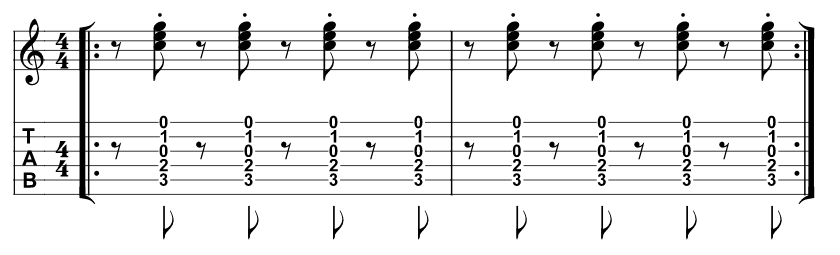

 Wondering how to dance to The Specials, The Villains, and all your other favourite ska music? Look no further.
 This spaced-out tempo gave more room for experimentation. Guitar and piano players started going beyond the simple offbeat, adding other accents besides the classic 2 and 4 for more complex syncopated rhythms. Bass players, rather than being confined to writing walking basslines to keep up with ska’s tempo, also started experimenting with syncopation. Meanwhile, the brass section took a backseat, with horns playing a supportive role.