Learning to create music on my computer has been one of the most creatively fulfilling experiences of my life. I’m here today to convince you that it’s not as difficult as you may think. In fact, many of you will be able to get started making music today.
If you have a computer, you only need a few other pieces to get started. This article will cover exactly what you need (as well as what you don’t need). I’ll provide a quick introduction to the different recording options, as well as tips for arranging and mixing your tracks on the computer.
The goal of this article is to inspire everyone from those new to making music to seasoned pros. You don’t have to buy an expensive home studio, nor do you have to be technically gifted – all you need is a love for making music.
With that, let’s jump right in!
Gear Overview
Before we dive into the meat of the article, a quick gear checklist is in order. You may be surprised to find that you have most of the gear you need. However, there are a few pieces of equipment that you need to consider, and a few you can ignore while you’re just getting started. This includes:
- DAW (digital audio workstation)
- MIDI controller
- Audio Interface
- Mixing Equipment
Your DAW
As you would expect, the most crucial piece of the puzzle comes in the form of software. Namely, DAWs, or digital audio workstations. DAWs are programs that run on your computer that allow you to record, edit, and produce audio files. As you may expect, there are a number of different options on the market. The good news is, you can always get your hands on something for free. Here are my recommended free options:
- GarageBand (Apple iOS only)
- Pro Tools First
- Ableton Live Lite (comes with purchase of certain MIDI controllers)
There will be limited capabilities with each of these free DAWs, but they’re a great way to get a feel for what creating music on your computer is like.
Alternatively, for those who want the full versions, some of the most popular DAWs for creating music are as follows:
- Logic Pro X
- Fl Studios
- Ableton Live
- Reason
- Cubase
Most of these options will have a free trial period where you can test them out. Another great way for you to get your hands on a DAW without spending any of your hard earned cash!
This list isn’t comprehensive – there are plenty more options available. Make sure you do your research before pulling the trigger. Keep in mind that some DAWs are better than others for certain genres. For example, Ableton is often the choice of DAW for creating electronic music.
MIDI Controller
The next piece of equipment you need to consider are MIDI controllers. MIDI (short for musical instrument digital interface) is a protocol designed for controlling digital instruments. It does not produce any sound, rather, it simply transmits information on how the music was produced.
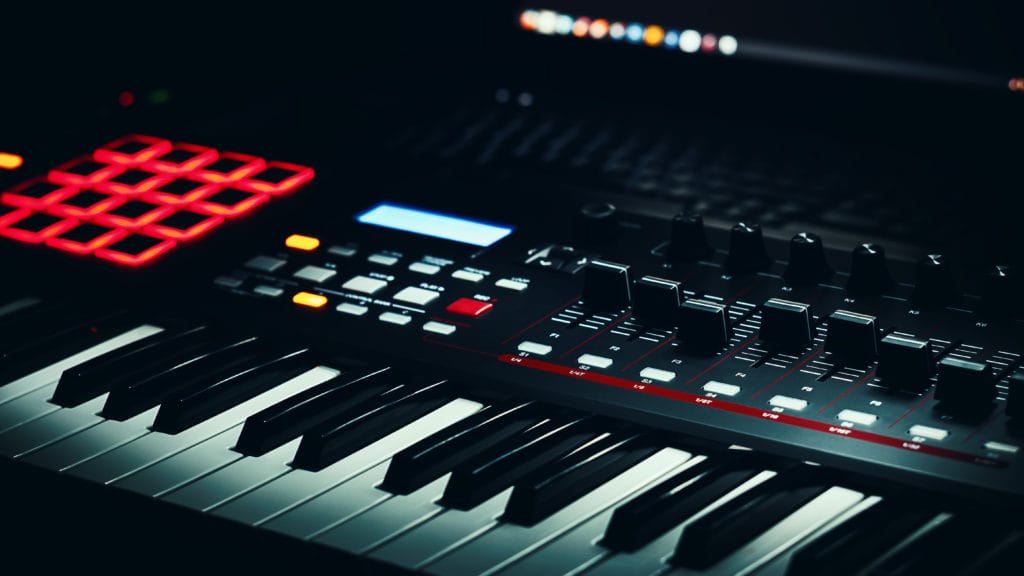
In other words, MIDI is what allows your electronic instruments and your DAW to communicate with each other.
The easiest way to create MIDI information is with a MIDI controller. MIDI controllers usually come in the form of basic keyboards. The main difference is the MIDI controller only produces MIDI information and no sound.
Your MIDI controller doesn’t have to be complicated. I recommend getting something with just the basic MIDI features – something like the AKM320 midiplus. All of the other bells and whistles that come with fancier MIDI controllers can easily be controlled in your DAW.
If you’re really on a shoestring budget, you can skip the MIDI controller altogether. It will make things a little harder, but there are plenty of producers I know who only use their keyboard and mouse.
Audio Interface
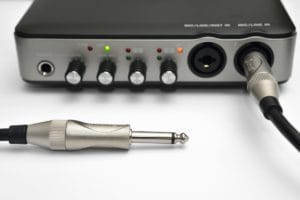 Anyone who wants to record their instrument needs an audio interface. Audio interfaces provide the link from your computer to any of your external hardware. This includes your piano, guitar, headphones, monitors, and microphone.
The quality of audio interfaces today is at a point where you can get professional results from entry-level interfaces.
Again, there are plenty of options for you to choose from. Getting something with just the basic features is a great place to start. Make sure the interface is able to accommodate any instrument you’d like to record. Recording Revolution goes through a quick rundown of some of the more popular options:
Mixing Equipment
Many artists who begin making music on their computers fail to realize one very important thing: mixing is almost half the battle. They underestimate the power that mixing has on the overall sound of the track.
This is why mixing equipment is widely discussed amongst the DIY community.
What kind of equipment are we talking about here?
Most of us will be able to get away with two pieces of mixing equipment:
- Mixing headphones
- Studio monitors
We can ignore the expensive multitrack mixers, analog reverbs, compressors, etc. Most of this hardware has now moved to digital and will be included with your DAW.
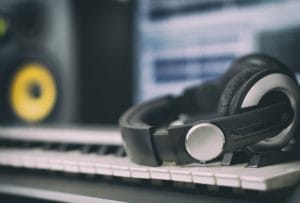 However, headphones and monitors are essential for getting quality mixdowns. The good news is, you won’t need to purchase mixing specific equipment to get things moving. I waited a few years until I had the production side of the coin under wraps before I bought my first set of mixing headphones.
Why can’t you just use your regular headphones or speakers?
Well, the short answer is: accuracy. Consumer headphones and speakers have their frequency spectrums adjusted in order to color the recording. The end result is the tracks usually sound “nicer” on consumer products.
Unfortunately, mixing with colored frequency spectrums makes it incredibly difficult to accurately hear what you are mixing. You want what is called a “flat frequency” spectrum. Mixing headphones and monitors provide this flat frequency spectrum for the best accuracy possible. The idea is, if you can get the mix sounding good on studio monitors, it will sound fantastic on consumer systems. I’ve created a beginner friendly guide on selecting studio monitors.
That wraps it up for the gear required. I suggest starting off with one of the free options for DAWs and working your way into getting the other gear required.
Types of Audio Files
Now that we’ve got our gear situation sorted, let’s understand how music on your computer is stored as files.
There are two different types of audio files you will be using to create music: MIDI and audio. They both have pros and cons, and producers usually have a preference for which file type they like to work with.
That being said, most projects are a mix of audio and MIDI files, so it’s important to become familiar with them both.
Audio
When you think of a recording of audio you are probably picturing the audio file format. It can look something like this:
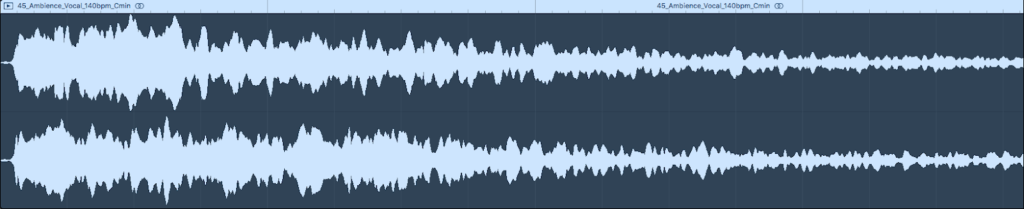
You see a visual representation of the audio wave, as well as information of the stereo field and gain of the recording.
This is the kind of file you will record whenever you are using physical instruments. Many of the sample recordings (professional recordings of instruments) and loops will be recorded as audio.
Producers generally like to work with audio because it’s much easier on their computer’s processor. It’s also much easier to mix and clean up audio files. You can easily remove sections, blend things together, change the length, pitch and tempo. The only downside to audio files is you cannot change the musical aspect of the recording.
MIDI
This is where MIDI files start to become beneficial. Here’s what MIDI files look like:
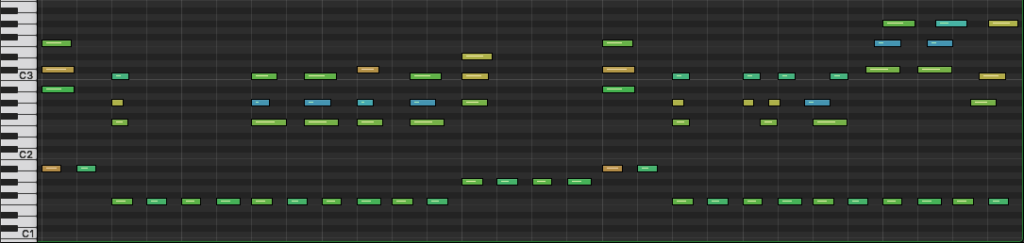
Because the information is recorded in MIDI, you can use the same file to control any style of digital instrument. You can change the overall musical structure of the recording, such as the note arrangement, the chords, and the velocity.
The downside is MIDI takes a lot of processing power if you are running multiple MIDI tracks concurrently. It’s also more difficult to make adjustments to the midi recording. The good news is, once you are happy with the musical arrangement of the file, you can easily bounce the MIDI down to audio and finish your editing.
Having a basic understanding of the two main file types will go a long way when you are beginning to make music. In summary, MIDI is to be used to control any digital instruments and audio files will be used to record any physical instruments.
Arranging and Layering
A huge advantage to modern DAWs comes in the form of workflow. The modern interfaces make recording and arranging your songs incredibly intuitive. Have a quick look below at a new track I just started working on:
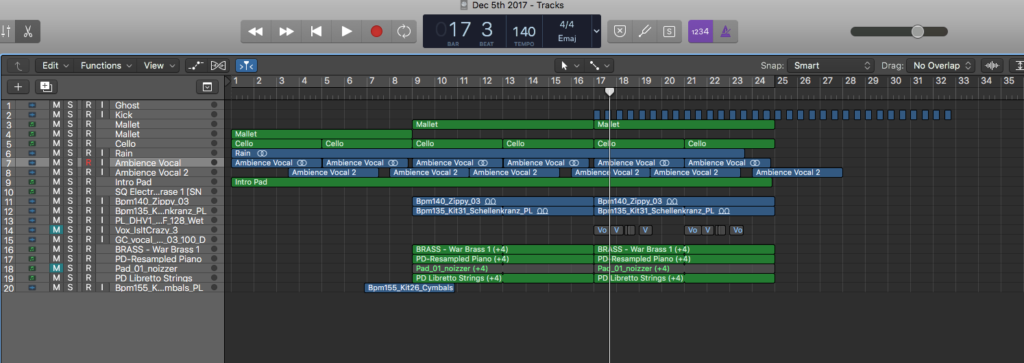
The different tracks can easily be arranged and layered. You can copy and paste different sections and easily loop different components.
Each track can be edited individually, or as a group of tracks.
Producing and editing tracks is extremely intuitive once you get a hang of things. The entire process, from recording to mixing, can be completed all within the DAW.
It can be as easy as picking a tempo, key, two to three chord progressions, a melody, and a lead. You can easily blend natural instruments with digital instruments. You can mix and match different loop files (recordings from professionals that come with your DAW) with different sample files. The possibilities are endless.
Nearly every genre of music can be created in a computer. All it takes is a little patience to learn the technical side of the software.
Mixing and Effects
Mixing is a complicated subject that would require an entire book to cover. However, I’ll provide a quick glimpse of how you will use mixing and effects to improve your tracks.
Each instrument fits within a certain frequency range. When you layer multiple instruments in a recording, these frequency ranges can sometimes clash. This results in complicated phase interactions that can lead to your mix sounding muddied and unclear.
This is where your mixing talents are used. Each track will have to be mixed individually to fit within the larger whole.
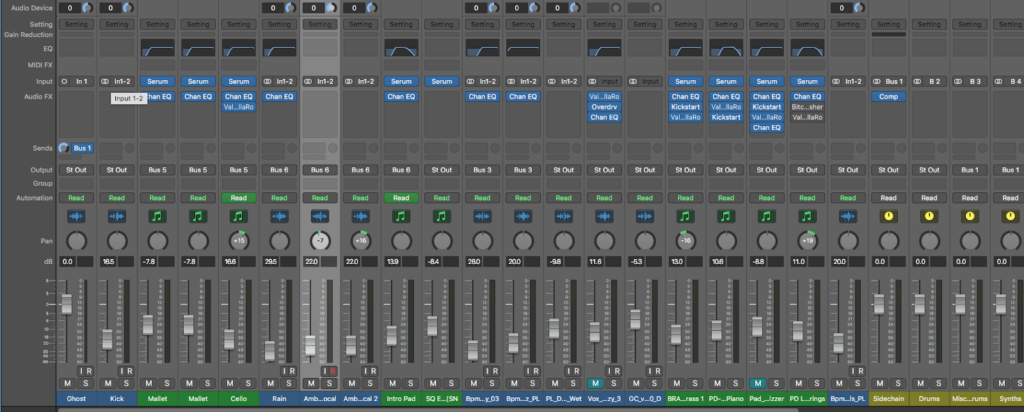
This primarily involves digital EQs, faders, compressors, filters and other mixing components. You will use your ears to cut or boost certain frequencies so that the track blends well with the others. You will also use the volume faders and digital pan settings to place the track in pleasing locations within the mix.
The digital mixer looks something like this:
Mixing is an advanced skill that you generally pick up along the way. There are many courses and online tutorials to help you with the entire process.
Another added benefit of making music on your computer is digital effects. These include things such as reverb, delay, chorus, distortion, compression, and every other effect you can think of.
These effects will play an important role in making your track sound professional. It’s as easy as adding the effect to the track and playing around with a few settings.
Your DAW will come preloaded with most of the basic effects and mixing features. Of course, you will want to selectively upgrade certain features as your need grows. You’ll be happy to know that many producers still use a lot of the stock plugins when they are making their tracks.
Sound System
Beware, making music on your computer can be incredibly addicting. I will often start working on a track only to look up and see that four hours have disappeared. That being said, it’s one of the most creatively fulfilling skills I have learned.
No matter what your style of music, I’m sure you can start making it on a computer. As I mentioned above, get your hands on one of the free options available and get a taste of how satisfying it can be.
Thanks for reading – I hope this has inspired you to give making music on your computer a shot!
Making music on the computer is not reserved for the electronic musicians among us! Whether you play the electric keyboard or the tenor saxophone, you can take advantage of looping, EQing, effects, and all the other tools that DAWs have to offer.

The post The Beginner’s Guide To Creating Music On Your Computer appeared first on Musical U.